Google has come up with a new product to help computer researchers, who may not have all the required infrastructure at every point. It is called Colaboratory and provides the user with a runtime environment which can optionally be connected to GPU for intensive computations.
The tool comes with various versions of Python and supporting libraries pre-installed. It can connect to your Google Drive to access custom data. All in all, as long as you have an internet connection, a browser and a Google Account you can code on the go. The best part? It is free*.
The restrictions are that the runtime is refreshed every 12 hours. So any data and computation not saved will be lost. The hardware provided is limited. (12GB of GPU memory and 25GB of CPU memory).
However, as I said, if you want something quick and easy to try out something before you end up paying for Cloud providers – Colab is the way.
So let’s get started and get a sneak peak into Google Colab.
- Go to Google Colab and sign in to your Google Account
- Create a new Notebook at the bottom.
- It will take you to a new tab and open an interface as follows:
4. Rename the file to whatever you want. This interface, people familiar with Jupyter in Python would know, is called a Notebook. If you are familiar with Notebooks, you can skip over to the next section. However, if this is something new to you, keep reading.
About Notebooks – a short introduction:
A notebook is made up of cells. Each Notebook can have multiple cells. A cell can contain parts of code or text. A code cell is executed by clicking on the Play like button on the top left corner of the cell.
Usually, text is used to explain the code or comment on parts of code.
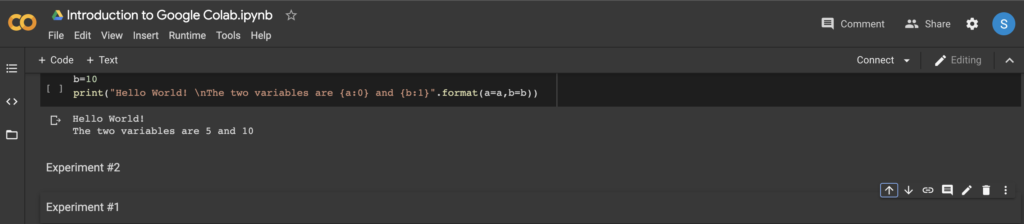
Let’s write a small code and see if you can follow.
a=5
b=10
print("Hello World! \nThe two variables are {a:0} and {b:1}".format(a=a,b=b))
Now, let’s execute it by pressing the Play button on the top left corner of the cell or simply press SHIFT+ENTER. You should see an output as follows:

Awesome! Running a code on Google Colab is as easy as that. Now, let’s do 1 more small part of code before we move on to other functionalities of Google Colab.
Add a text cell by clicking on the text cell below the Menu bar. Let’s write there Experiment #2. For fun’s sake.
But wait a second. Where is Experiment #1? Worry not! Add another text cell and write Experiment #1 there. Once you have done that, look at the top right corner of the cell. You will find an upward pointing arrow as follows:
Click on it. It will take the entire cell up by one cell. Press it again and the text cell has reached the required spot. You can move the code cells as well in the same way. Moving around cells is that easy.
Now, let’s continue with our second part of the code. Create a new code cell below the Experiment #2 text cell.
a=1
b=2
Create another code cell and write the following code there:
print("Hello World! \nThe two variables are {a:0} and {b:1}".format(a=a,b=b))
Great! Now without running the second code cell, run the third code cell.
It will still show the values of a and b as 5 and 10.
Now run the second code cell and then run the third code cell again.
Now you will see the values being updated.
So, each code cell is an independent code and as long as all the variables or functions have a context, they would be executed. You can use this to control the code flow for debugging the code or any other purpose while you code.
So far so good? You are all set with the Notebook. There are many more things to learn about Notebooks, but this introduction is good enough for you to begin and explore. If you are interested, this is a good source to begin with.
Google Colab – Explored!
Playground Mode:
If you want to mess around your notebook without making long term changes, you can activate Playground Mode. Any changes made during this time will not be saved. To activate Playground Mode, go to File -> PlayGround Mode.
Playground Mode essentially creates a read-only copy of the current notebook, wherein any changes made to the copy are not reflected here. You can use this mode to share your notebooks with anyone without worrying about them breaking your code or notebook
Scratch Code Cell:
Just like a scratch pad, this is a scratch code cell, wherein you can try playing around with a small snippet of code without impacting the overall notebook.
To insert a scratch code cell, Go to Insert-> Scratch Code Cell.
Insert Code Snippets:
Google Colab has been out for almost a year now and Google has some idea about what codes do people use often. It has a few code snippets already. To see which code snippets are available, go to Insert->Code Snippets.
Change Runtime type:
By default, Google provides a CPU based runtime. However, it also gives you an option to change this to a GPU based runtime or a TPU (Tensor Processing Unit ) based runtime to train your neural networks. To do this, go to Runtime -> Change Runtime Type -> Select hardware accelerators.
Once changed, you can write code normally as you would to access these hardware accelerators.
Command Palette:
Just like with every Programming tool, this too comes with a Command palette. Go to Tools -> Command Palette and type “Drive“, it would come up with an option to insert a code snippet to connect your notebook to your Google Drive. Let’s go ahead and do it. It is as easy as that. You can also press Ctrl+Shift+P to access the palette from your keyboard.
Now, please note that this is not a complete guide to Google Colab. This is meant just as an introduction to Google Colab so that the next part of my blog can be followed easily without any other setup from your end.
If there is a mistake, please comment below so that I can correct it. If you find something more interesting, feel free to share it with others below. For a more complete guide, check out Google’s documentation here. These instructions might change in the future if Google updates its product. I hold no responsibility for the same.
*NOTE: For Pro users in the US, Google provides for a paid option of $9.99 per month for a runtime of 24 hours and faster GPUs. If you are interested, check it out here.